|
Password Protect
Terminals can be password protected and multiple users can access the same terminal from multiple locations.
|
Terminals allow manufacturers to control how data collection will be executed. Terminals are used by employees on the shop floor but can also be used by all employees in the company for different data collection purposes.
There are 2 types of terminal in LYNQ:
- Clock-In terminal
- Shop Floor terminal
Clock-In terminals are typically located at the entrance of the building or production unit to track employees clock in and clock out time. This type of terminal may be used by all employees regardless of their functional role. Clock-In terminals are typically limited in their functionality.
Shop Floor terminals are typically located on the shop floor and situated within the relevant production unit. These terminals can be configured by equipment, crew or employee to display scheduled/unscheduled shop orders or only shop orders within a specific time frame or within custom filter definitions. Additional elements can be included, (e.g. Break, Lunch, Material Issue, Kit Issue, Production Issues) providing employees with the ability to complete all their reporting requirements from one simple screen.
LYNQ is shipped with 8 pre-configured workbench terminal definitions ready for immediate use. The configuration of these terminals has been designed to service well established manufacturing models and you can start to use them as a template with minimal further configuration.
|
Terminal Name
|
Description
|
|
1 – Entrance
|
Clock in and out to start/end your data
|
|
2 – Basic
|
Basic terminal with limited options
|
|
3 – Advanced
|
Advanced terminal with extended functionality
|
|
4 – Crew
|
Advanced terminal with crew functionality
|
|
5 – Time Entry
|
Time entry terminal for employees using timesheets
|
|
6 – Equipment
|
Equipment terminal with downtime tracking
|
|
7 – Materials
|
Advanced terminal with materials issue capabilities
|
|
8 – Office
|
Office terminal for non-manufacturing personnel
|
Example of the Advanced Terminal Template
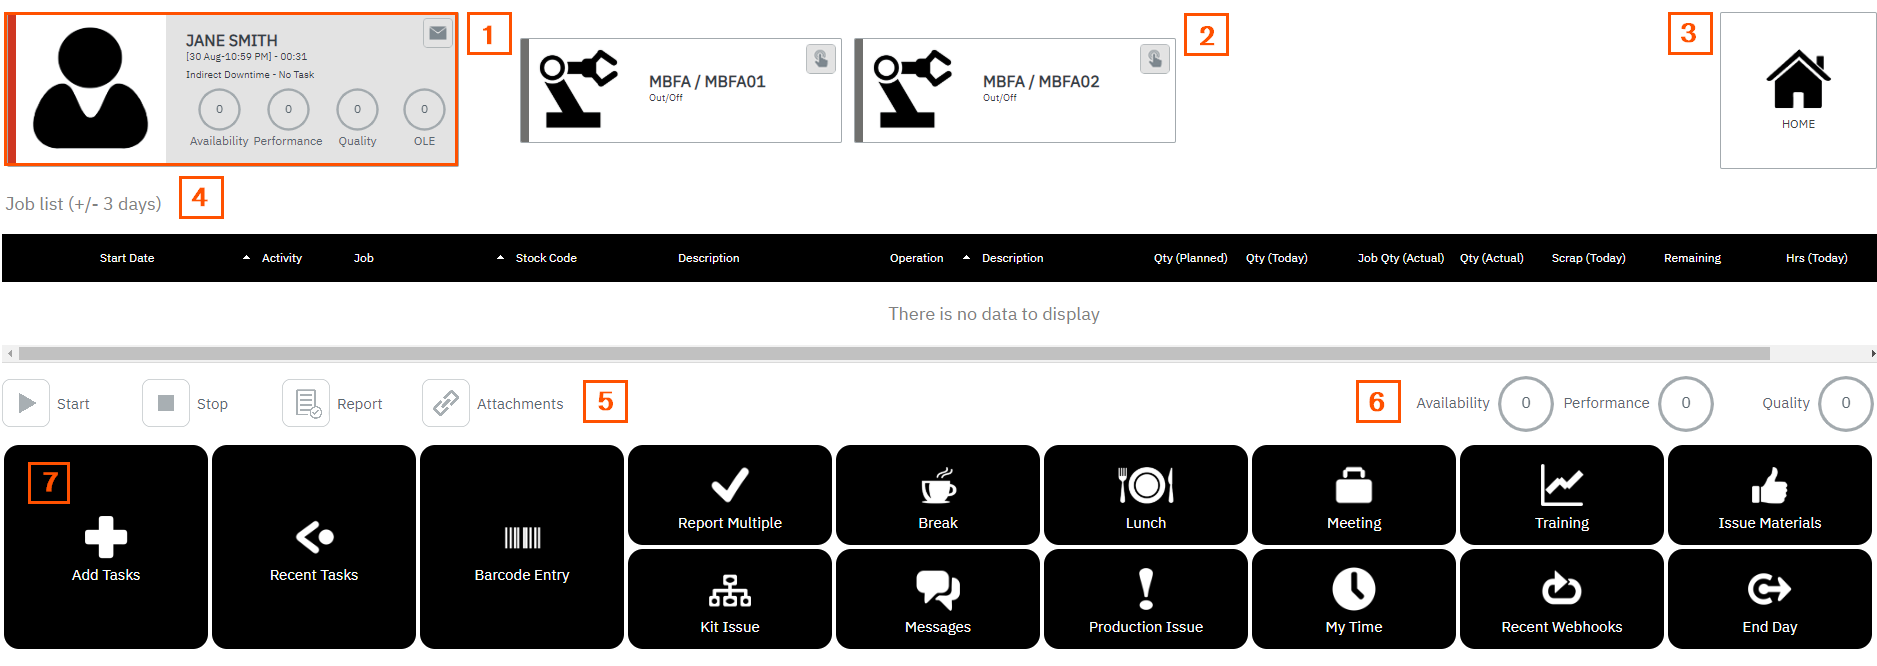
Explanation of the different elements on the workbench screen.
|
Element
|
Description
|
|
1 – Employee Status Indicator
|
Employee clocked into the workbench showing their clock in time, current status and key performance indicators. Status indicators will update once a job order has started. By default the employee will be in the status of indirect downtime if no job order is running.
|
|
2 – Linked Equipment
|
The equipment that is linked in terminal setup. The employee can turn the equipment on to see job orders that have been dispatched. Job orders can be started from this panel and if the trigger employee setting is enabled in the Workbench On Screen Element, labour time for the employee will also be collected. Once a job order has been started, the status indicators will change to show the type of activity being performed.
|
|
3 – Home
|
Takes the employee back to the workbench home screen (clock in)
|
|
4 – Job List
|
Shows a list of jobs that are scheduled. The job list can be filtered by period in the Workbench On Screen Elements settings
|
|
5 – Terminal Controls
|
Shows what controls a user can performed. The controls can be turned on or off in Workbench On Screen Elements settings
|
|
6 – Key Performance Indicators
|
Shows key performance indicators. This can be turned on or off in Workbench On Screen Elements settings
|
|
7 – On Screen Elements
|
Shows the different functions are user can perform, These can be turned on or off in Workbenh On Screen Elements settings.
|
To configure new terminals or amend existing terminal templates, go to Terminal Maintenance
.
|

